Troubleshooting your Visual Odyssey Software
____________________________________________________________________________________________
Download Neuropatholator Manual
Computer Requirements
How do I find how much Memory(RAM) my PC has?
- Locate the My Computer icon.
- Right-Click the icon and select Properties.
- Look under the General tab to find your RAM.and how much RAM do I need to run the software?
- Computers today take at least 1G(gigabyte) of ram to run itself, so in total the computer should have at the least, 2Gs of RAM memory.
Which software by Visual Odyssey do you have?> Neuropatholator> Sigma Align> ProAdjuster> CLA> Wellness Practice
Tech Support Plan (open with adobe reader / .pdf)
Neuropatholator
________________________________
**Is this the first install on this computer?
If so, click here and follow instructions under Troubleshooting – First Time Install
- OR**Has the software worked on this computer before?If so, click here and follow instructions under Troubleshooting – After initial install> AFTER INITIAL INSTALL> If this has not solved your problem–
- Questions about:
- Tours
- Custom JPEGS
- How to insert JPEGS into your slideshow
- Scripting
- Program Features
- Click here for Online Manual
Troubleshooting – First Time Install
1) Installing the Disk
- Did you copy the VO Folder onto your desktop from the CD or DVD marked Neuropatholator? (Open “My Computer”, right click to open the disk; right click on VO Folder and left click ‘Copy’. Go to the desktop; right click; then left click ‘Paste’ to transfer VO Folder to your desktop. Once this is complete, you are finished with the disk and you should remove it.)
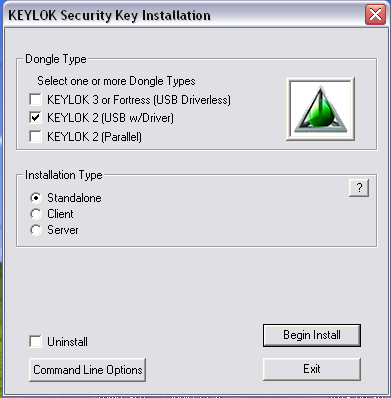
- Open the VO Folder that is on your desktop. Double-click on the program called “1_Install_Dongle.” Security Key Installation will appear.
Select Green USB or Tan PARALLEL Dongle
Click OK to the DO NOT attach the USB Dongle message, click Begin Install
OR Attach the Parallel Dongle, then click OK.
Click ‘Standalone’ and then click ‘Begin Install’.
- Questions about:
- Once dongle installation is complete, a window will come up that reads “Install Success”.(The time for this step will vary depending upon the speed and memory of your computer.)
2) Installing the Dongle
- Insert the USB Dongle and let the “Found New Hardware Wizard” run. (If prompted to connect to the internet to search for drivers, select “No, not at this time” and click “Next”. The dongle drivers should be automatically detected.) Click “Finish,” completing the dongle installation.
Install your Prefs and Security Files (if they are not already in your VO Folder) as indicated in the below instructions. Your Prefs and Security files should have been sent to you either via email or on a separate CD.
3) Downloading your Prefs and Security file
- Open your Email; Right Click on the Attachment.
- Choose SAVE AS; SAVE AS TARGET; DOWNLOAD; (or whatever your email uses as a download choice)
- Download the Zip file to your desktop.
- Unzip the file (by right clicking and choosing Extract) and remove
- the prefs & security file;
- Move or Copy the Prefs & Security file into your VO folder; Then launch NP program.
- Note: If Prefs and Security Files came on a separate CD, insert CD into computer. Copy and paste those two files into the VO desktop folder.
4) Launching the Program
- Open your Email; Right Click on the Attachment.
- Choose SAVE AS; SAVE AS TARGET; DOWNLOAD; (or whatever your email uses as a download choice)
- Download the Zip file to your desktop.
- Unzip the file (by right clicking and choosing Extract) and remove the prefs & security file;
- Move or Copy the Prefs & Security file into your VO folder; Then launch NP program.
- Note: If you are using Windows Vista, you may need these additional steps.
- Right Click on “Properties” / Click “Compatibility” Tab
- Under Privilege Level, check box-Run as Administraton
-
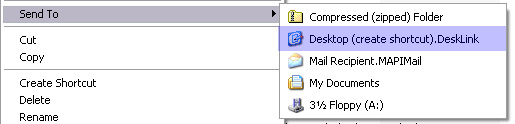
5) Creating a Shortcut on your Desktop:
- Right click on the Neuropatholator icon and choose Send to > Desktop (create shortcut)
Troubleshooting – After initial install
- Have you had a recent Windows Update or recently upgraded your computer?
- If so, you will need the new dongle install program.
- Click here to download the new dongle install program
- Are you launching from a shortcut? Click on the NP icon from within the VO Folder. If program works, then make a new shortcut. If program does not launch from VO Folder, then re-install the drivers (see below).
- Are you in Administrator Mode? If not, reboot and log on as Administrator
- Is the dongle plugged in? If not, plug it in.
- Did you purchase the program directly from Visual Odyssey? If so, note Version #.
- How old is this computer? What is the Operating System? This program should run on Windows XP, Windows Vista, Windows 7, and Windows 10.
- How much memory does this computer have? (Right click on “My Computer”, then right click “Properties” to find memory-ram. 2GB is recommended.
- Have you attempted to change your Practice Name on the program? If so, you will need to reinstall your PREFS file from your disk or email for the program to work again. (Note:You will need to call our office for a Practice Name change.)
- Do you have a VO Folder (TWP, NP for CLA, SIGMA, HV, etc) on your desktop?
- If not, copy VO Folder (or TWP, NP for CLA, SIGMA, HV, etc) from CD or DVD onto desktop. Install drivers & dongle (see instructions above).
- Make sure that all files have completely transferred from the CD or DVD to the desktop.
- Are you running from a shortcut or from the icon within the VO folder?
- Make sure the main NP program icon is INSIDE the VO Folder.
- Test the Dongle
- Open the VO folder: Click on “TEST” or “VERIFY LOCAL KEY” (padlock)
- This opens an empty folder. At the top click on the words “Check for security Device”. You will get a message.
- If SUCCESSFUL-Proceed to add your Prefs & Security File
- If FAILED-Proceed to instructions below to Reinstall Drivers for USB dongle.
To Reinstall the Drivers for USB Dongle:
- Remove the USB dongle from your computer.
- Open VO folder; Doubleclick on #1_INSTALL Program.
- Check the box at the bottom to UNINSTALL.
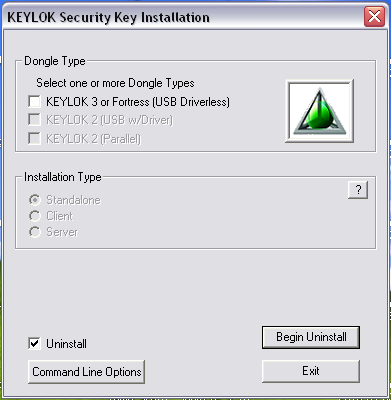
- Close the Install Dongle Program
- Open “1_INSTALL DONGLE, check USB and STANDALONE and BEGIN INSTALL.
- Click OK or NEXT to the prompts. It should read DONGLE SETUP HAS BEEN COMPLETED.
- Now, plug in the USB dongle and Run the Install Wizard.
- Note: You may want to TEST your Dongle again by following the TEST THE DONGLE instructions above.
To Reinstall the Drivers for PARALLEL Dongle:
- Open VO Folder; Doubleclick on #1 INSTALL Program.
- Check PARALLEL and STANDALONE and BEGIN INSTALL.
- Click OK or NEXT to the prompts. It should read DONGLE SETUP HAS BEEN COMPLETED.
To Download your Prefs and Security files:
- Open your Email; Right Click on the Attachment:
- Choose SAVE AS; SAVE AS TARGET; DOWNLOAD; (or whatever your email uses as a download choice)
- Download the Zip file to your desktop;
- Unzip the file (by right clicking and choosing Extract) and remove the prefs & security file;
- Move or Copy the Prefs & Security file into your VO folder.
- If Prefs and Security Files came on a separate CD, insert CD into computer. Copy and Paste those two files into the VO desktop folder.
To Create a Shortcut on your Desktop:
- Right click on the Neuropatholator icon and choose Send to > Desktop (create shortcut)
Other Troubleshooting Tips – Problems Launching the Program
1) PREFS PROBLEM – If when launching the program, it scrolls at the bottom and loops from 2-6a, the problem is with the PREFS. Please re-install your PREFS file from your Email or Disk.
2) NEW INSTALL PROGRAM NEEDED – If you have recently had a Windows Update or have upgraded your computer, you will need to download the new install program.
Click here to download new install program
3) ADMINISTRATOR PROBLEM – Make sure you are logged on as Administrator of this computer before launching software. You may need to right click and ‘Run as Administrator’ the first time you launch the program to be recognized as ‘Administrator’.
You may need Extra Step for WINDOWS VISTA/WINDOWS 7:
Vista Security Privilege Level-Administrator
- Right Click on “Properties”
- Click “Compatibility” Tab
- Under Privilege Level, check box-Run as Administrator
*If these tips have not remedied your problem, please call 800-541-4449 between 9:00AM – 4:00PM EST M-F. Someone will return your tech call.
Remote tech support is available for $19 per incident.
Click here to read about our Technical Support Programs and Options
*If these tips have not remedied your problem, please call 800-541-4449 between 9:00AM – 4:00PM EST M-F. Someone will return your tech call.
For Return Policy – Please call first!
Sigma Align
ProAdjuster
CLA – Subluxation Station
Wellness Practice – James Chestnut, D.C.________________________________________________________________
* When in slideshow mode, click CANCEL to exit.
>> In other modes click the top right arrow to return to the main menu.
> Click manual to switch to automatic in the PLAYBACK section.
last updated 12/27/18